5. Writing the JavaScript WebPart
In this WebPart, I intend to start with a given ID
for a list item and using the client object model I will fetch the
details of that item and display them to the end user. You could have
written this JavaScript in the Content Editor WebPart, but to keep
consistency with my project, I will write this as my own WebPart. Also
in the next section I will connect this JavaScript WebPart to the
previous Silverlight WebPart and establish WebPart communication that
works without postbacks.
So let's begin writing the JavaScript WebPart. In
your same Scheduler SharePoint project that you have been working with,
add a new WebPart called IndividualAppointment. Go ahead and modify the code of the WebPart as shown in Listing 9.
Example 9. IndividualAppointment WebPart
public class IndividualAppointment : WebPart
{
  protected override void CreateChildControls()
  {
    this.Controls.Add(
      new ScriptLink()
      {
        ID = "SPScriptLink",
        Localizable = false,
        LoadAfterUI = true,
        Name = "sp.js"
      }
      );
    this.Page.ClientScript.RegisterClientScriptInclude(
      "IndividualAppointmentScript",
      ResolveClientUrl("/IndividualAppointmentScripts/appointment.js"));

    base.CreateChildControls();
  }

  protected override void RenderContents(HtmlTextWriter writer)
  {
    writer.WriteLine("<div id=\"appointmentDetails\"/>");
    base.RenderContents(writer);
  }
}
|
As you can see from Listing 9,
in the CreateChildControls method I'm adding an instance to ScriptLink.
This adds the necessary framework files required to use the client
object model in JavaScript. Next I read a custom script called
/IndividualAppointmentScripts/appointment.js. Obviously, this is a
script that I need to write and deploy along with my WebPart. This will
be deployed as a module. This script will fetch the details of a
particular item, and write the contents in the <div> being written
in the RenderContents method.
So go ahead and add a new module into your project and call it IndividualAppointmentScripts.
In this directory, add an appointment.js file and delete the sample.txt
file. In the appointment.js file, go ahead and write the code as shown
in Listing 10.
Example 10. Code for Appointment.js
var idToFetch = 1;
var appointments;
function FetchAppointment() {
  var context = SP.ClientContext.get_current();
  var site = context.get_web();
  var list = context.get_web().get_lists().getByTitle("Appointments");
  var camlQuery = new SP.CamlQuery();
  camlQuery.set_viewXml("<View><Query><Where><Eq><FieldRef Name='ID'/><Value
Type='Number'>1</Value></Eq></Where></Query></View>")
  appointments = list.getItems(camlQuery);
  context.load(appointments);
  context.executeQueryAsync(onSucceeded, onFailed);
}

function onSucceeded(sender, args) {
  var listItemEnumerator = appointments.getEnumerator();
  while (listItemEnumerator.moveNext()) {
    var listItem = listItemEnumerator.get_current();
    $get("appointmentDetails").innerHTML = "<b>" + listItem.get_item('Title') + "</b><br/>" +
listItem.get_item('Description');
  }
}

function onFailed(sender, args) {
  alert('request failed' + args.get_message() + '\n' + args.get_stackTrace());
}

_spBodyOnLoadFunctionNames.push("FetchAppointment");
|
As you can see from Listing 10,
I have a couple of global variables. One is the ID of the appointment I
intend to fetch. I'm including this ID in a CAML query, which is then
executed on the server using the client object model. To get our functionality running, let's go with the
hardcoding. Then there is the appointments global variable, which will
contain the fetched appointments from the server. Because our CAML query
matches on ID, you will have only one appointment matched at any given
point.
Also you will note at the end of the script that is an interesting command, as follows:
_spBodyOnLoadFunctionNames.push("FetchAppointment");
This command is a part of the standard SharePoint
JavaScript infrastructure. This results in the FetchAppointment method
being called after the entire page is done loading.
When the FetchAppointment method is called, you get
an instance to the current ClientContext using the client object model.
Once you have a handle to the ClientContext, the code is quite similar
to the Silverlight equivalent. The notable differences are that instead
of using the LoadQuery method, I'm using the Load method. Also, I'm
using SET and GET methods to set the various properties as necessary.
But similar to Silverlight, I call the ExecuteQuery method and pass in
the callback methods of onSucceeded and onFailed.
In the onFailed method, I'm simply showing a message
box to the end user, informing him of the error. But in the onSucceeded
method handler, I'm getting a handle to the listItemEnumerator using the
appointments global variable that I created earlier. Using this
enumerator, I get a handle to the selected list item and then I can
format some HTML and put it in div, which I created in my code-behind.
That's basically it. Go ahead compile and deploy your
WebPart and drop it on the home page of your SharePoint web site. You
should see the WebPart running as shown in Figure 5.
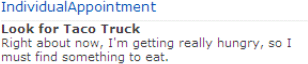
As you can see, your JavaScript code can successfully
call the client object model from the client side and can fetch the
details of the list item with ID = 1 because the ID=1 has been hardcoded
in the JavaScript, which is great.
Now you have two WebParts: the Silverlight WebPart
that shows you all the list items and the JavaScript WebPart that shows
you a single list item. Now wouldn't it be nice if selecting a
particular list item in the Silverlight WebPart updates the details on
the JavaScript WebPart ?
This sounds like a job for WebPart communication,
something you've already seen. So obviously I can extend these WebParts
to communicate the ID of the selected appointment among each other.
Also, I can probably figure out the JavaScript ID variable var
idToFetch, to be driven by a property in the code-behind. But wouldn't
it be nice if selecting appointments from the Silverlight WebPart
automatically updates the JavaScript WebPart without causing postbacks?
In other words, the communication between WebParts would work without
using postbacks. Let's implement that next.